Friday, December 31, 2010

Real Flowers, On a Budget

Source
 Our wedding flowers are one of those things that I am really picky about. I'm using silk flowers for the ceremony, candle centerpieces for the reception, but for my bouquet, I wanted real flowers. I also wanted roses. And I was not budging. Fortunately, Tom understood my desire for a real flower bouquet and without debate made sure that there was room in the budget for them.

Wow... maybe I should explain myself. 

I'll begin by stating that I have absolutely nothing against silk flowers or some other non-flower bouquet (brooches, butterflies, etc.) They just are not for me. I have seen some silk bouquets that look so real I've had to do a double take, and my mom will likely make a silk replica of my bouquet as a keepsake (she has for everyone else). My reasoning behind wanting real flowers is simple, I love roses. They are my favorite flower, which is something I share with my grandmother. Rose is also my middle name, so really, it's only fitting. I have yet to see a silk rose that truly captures the intricate beauty of a rose. I have also yet to see a silk rose that properly captures the scent of a real rose. Real it is. 

Real flowers have two major drawbacks. First and foremost, they die. There isn't much that can be done about that. My goal is to keep flowers in the fridge for as long as possible. Part of my reception decor will include vases put out on the head table full of water for bouquets. I'm also trying to figure out a way to keep the flowers in water on the way to and from the ceremony. I have time. 

The other major drawback is the price. Flowers are expensive. This is where I did my homework. First and foremost, I started limiting my total flower order. I opted to use silk flowers on my wedding arch and flower cones. This is definitely more economical, but it also makes more logistical sense. Tom and the boys will be setting up our ceremony site before the ceremony. Which means that the flowers will be sitting out in the September sun in a windy, ocean side environment for several hours before the ceremony begins. I was afraid the flowers would be wilted before the ceremony began. Not to mention, our ceremony is only going to be about half an hour long, I couldn't justify spending money on flowers that would only be used for such a brief period of time. As I hinted to above, our bouquets will be doing double-duty at the reception as decor.

In terms of reception flowers, I opted for candle centerpieces instead of the traditional floral ones. Most of my guests are travelling from out-of-state and would not be able to take the centerpieces anyway. I also love the look of candle light, and I really think it add a cozy, intimate feel to our reception. 
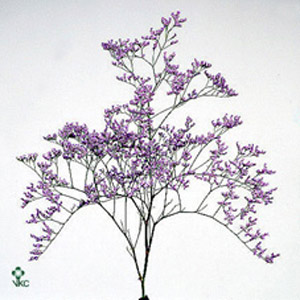
Limonium
Source
So, with reception decor and ceremony decor out, I was left with "personal flowers," which include my bouquet, my bridesmaid's bouquets, boutonnieres, and corsages. To save money here, I did my homework again. First of all, it was really important for me to have roses, but not so important for everyone else to have roses. So I have roses in my bouquet to set it apart from the bridesmaids bouquet. Tom has a rose in his boutonniere to set his apart from the groomsmen's bouts. Secondly, I researched what flowers would be locally available in September and came up with hydrangeas. It is difficult and expensive to ship flowers from across the country, or across the world for that matter. This cost is added to the price per stem. If you purchase locally, you will get a better price, AND as an added benefit, your flowers will be fresher and should last longer. My final strategy was to put faith in experts. When I visited the florist, I explained that I was on a budget, that my colors were Victorian lilac and celadon green, and that I was open to any recommendations she could give me. With that, the florist gave me the suggestion of limonium, which is like a purple baby's breath, and hypericum berries. I guess I should also add that I shopped around with different florists. I had five different consultations before I finally chose my florist and put my deposit down. 


Thursday, December 23, 2010

From Our Home to Yours


The tree is decorated, the lights are lit, shopping is done, presents are wrapped, and cookies are baked. It is definitely that time of year again. 

Tom and I would like to wish all of you a wonderful and safe holiday season. 

Merry Christmas!

Wednesday, December 22, 2010

Keeping Everyone Informed, our Wedding Party Newsletter


Tom and I are in Maine, which, conveniently is where our wedding is going to be. This adds a significant amount of convenience to the hole wedding planning process. If I need to look at a venue or speak with a vendor, they are all just a few minutes away. The wedding party, not so much. Tom and I chose our nearest and dearest friends to stand up with us as we exchange wedding vows. Sadly, this means that our wedding party is entirely out-of-state, peppered across New York, Missouri, and Florida. Thanks to the wonders of technology, we have been able to keep in touch with our friends through various instant messaging programs, Skype, Facebook, phone calls, and text messaging. The problem we ran into was getting everyone the same information at the same time.

Our first attempt was to create a Facebook Group, but this did not work out for various reasons. Then we thought about sending out mass e-mails, but I wanted to do something a little more creative. Our final product? As you see pictured above, we created a "Wedding Party Newsletter." It is really simple and straight forward; the first page features a note from me and Tom and our contact info, the second page contains information about wedding attire (deposits, measurements, due dates, dress style numbers), and the final page contains a wedding schedule and travel information. We wanted something straight to the point that provides the information they need in a format that can be easily accessed for when they need it.

I designed the newsletter on Open Office, my goal was to create something that looked like an actual newsletter. I simply used the Draw program, created text boxes,  typed in my information, and then surrounded the text box with a random shape. I also played around with fonts a bit. I'm quite happy with the final result. We mailed these puppies out on Friday, so the wedding party should be receiving them any time now.

Tuesday, December 14, 2010

Choosing the Ceremony Music

To simply say that I love guitar music would be an understatement. All of my favorite bands happen to have amazing guitarists too. I have been slowly learning to play guitar for the last couple of years, completely self-taught at that. I have liking for all guitar music, from rock-style riff of an electric guitar to the bellowing melody of an acoustic playing classical guitar.

When it came to ceremony music, I dreamed of having a classical guitarist play as I walked down the aisle. I neglected to look into the actual cost of hiring one because I assumed it was way out of my budget. I was planning loading my stereo with batteries and burning a CD. One lesson that I have learned in the process of planning our wedding is to stop assuming things.

I was prodded by a friend to look into the cost of a ceremony musician. I did, with the intention of seeing for myself that they were way out of my budget. My intention was to make myself feel better about burning a CD of our ceremony music. Like I said, assume nothing. I found a local classical guitarist that was well within my budget.

Now, I really want to walk down the aisle to "Storybook Love," which is the theme from Princess Bride. The movie is one of my favorite of all time. Seriously, I have gotten in trouble among friends because I can recite every single word of the script along with the movie. I digress. Anyway, I asked the guitarist if he could play "Storybook Love." He asked me to send him the name of the song and the composer, which I did. He responded back with a youtube video, just to confirm it was the right song. He went on to explain that he will learn the song for our wedding, for me to walk down the aisle to. I almost cried, happy tears of course.

Since then, I have been working to figure out the ceremony music. The guitarist will play half an hour of prelude music, I am leaving this up to him. He has a huge repertoire of music, which includes Latin music, classical, and contemporary pieces. I am also leaving him to his own devices for the postlude music. As for the actual ceremony music, this is what we have decided:


Our mothers will enter to Schubert's "Ave Maria." Yes, it's traditional, it's expected, but it's beautiful.


The bridesmaids will enter to Prelude to Cello Suite No. 1 by Bach.


And I will walk down the aisle to "Storybook Love" by Mark Knopfler.


Just listening to this, with the mental image of walking down the aisle to Tom in my wedding gown, makes me cry. I knew I was going to cry during our ceremony, but at this point, if I make it halfway down the aisle before the tears go, I would say I'm doing good.

Are you hiring a ceremony musician? What music did you choose?

Friday, December 10, 2010

9 months!!!

9 months to go! We are down to the single digits. I remember back when we were first engaged and the wedding was 19 months away, it seemed like it would take forever.

Despite the onset of the holiday season, I have to say that we were really productive this month. Major accomplishments include having our professional engagement pictures taken, signing the contract and putting down a deposit on our wedding cake, tasting our wedding cake, picking out the bridesmaid's dresses, and choosing our favors. On the DIY front, I decorated our card basket and toasting flutes, I finished our pinwheels, started the ribbon wands and bubbles, created pearl bobby pins, and corsages out of paper roses that I will use at the rehearsal dinner. I also started my out-of-town bags by ordering directions cards and welcome brochures, as well as ordered my bridesmaid's tea invitations, favor tags, guestbook pens, and a tote bag.

On the personal side of things, Tom got to meet half of my extended family over Thanksgiving at my grandmother's house. I would consider this a huge success, he fit in perfectly with my family.

My goals for next month are to address all the save-the-date cards, pay the deposits on the ceremony musician and florist, and order my dress. I am also going to be mailing out a bridal party newsletter that I designed. In terms of DIY projects, I am sad to say that I have no major projects planned for the next month aside from finishing my ribbon wands and the bubbles. If you look at my to-do list you will see that I have completed most of my projects, and the ones that are left; centerpieces, favors, and the wedding arch, will be completed in the months immediately before the wedding.

Until next month!

Thursday, December 9, 2010

Professional Engagement Pictures are In!

Source
Shortly after I posted about our engagement pictures yesterday, I received a phone call from our photographer to check my e-mail. They sent me a link to our pictures!

So here they are. I decided to post my favorites. The pictures really speak for themselves. The sky was clear, the ocean a deep blue, and the air was crisp, perfect for snuggling. The one to the left is my personal favorite.


Source


Source

Source

Source

Source

Source

Source

Source

Wednesday, December 8, 2010

The Suspense is Killing Me

I got a phone call this afternoon from our photographer. He finished editing our engagement pictures this morning, and is now in the process of uploading them. I should be able to view them online in the next 12-24 hours. I appreciate the heads up, and our photographer is absolutely amazing. The only thing is...  now the suspense is killing me. We had our pictures taken on a chilly November afternoon the Sunday before Thanksgiving. The weather was sunny, the skies were clear. It was just perfect. I can't wait to see the pictures!

Monday, December 6, 2010

DIY Toasting Flutes

It was my intent to slow down a bit on wedding planning for the month of December. It was my goal to enjoy the holidays and really focus on job hunting. This weekend, I went Christmas shopping with my mother at the Christmas Tree Shop. My intention was to find Christmas stockings for me and Tom, and maybe pick up a couple presents along the way. Mom and I got to the kitchen section, and we found these gorgeous crystal champagne flutes. My mother suggested using them for our wedding flutes. The price was amazing, $1.99 each. So I picked up a couple. So much for slowing down on wedding planning...

Once I got them home, I decided to decorate them a bit. I tied some ribbon around the stems into bows, and I added a seashell embellishment. It was really simple, but added the perfect little touch to our flutes. The look really pretty and elegant.

Tom expressed some concern when I initially began looking at toasting flutes and serving sets that the wedding sets are really expensive for something we would only use once. These flutes cost me just under $4 total, and we can easily take the bows off (if we decide to) and use the flutes for special occasions like New Year's Eve and anniversaries.

Sunday, December 5, 2010

Cake Tested, Bride and Groom (to-be) Approved!

Tom and I went cake tasting today with the baker we met with last month. We wanted to make sure that our wedding cake tastes as good as it looks. We were met with four cupcake boxes with two pieces of cake in each box. Two boxes contained lemon cake with almond buttercream, the other two boxes contained lemon cake with fudge buttercream. I tried the lemon/almond and Tom got to try his lemon/fudge. I was pleasantly surprised. I expected a dry, rich cake with an overly sweet frosting. In reality, it was a moist, lemony cake with a not-too-sweet but definitely almond buttercream. I loved it. The almond complimented the lemon perfectly.

To say that Tom loved his cake would be an understatement. He went silent and had a moment with his cake. He let me have a bite, and I was surprised yet again to discover that the fudge does indeed compliment the lemon. The fudge is more of a semi-sweet chocolate, so it works with the lemon.

The baker mentioned that she only bakes one cake each weekend so that she can give full attention to each cake that she makes. We were so impressed that we put down the deposit and signed the contract, and I have yet another detail about our wedding to be excited about!

Saturday, December 4, 2010

It's December!

My goodness, it's December already. When did that happen? The last week has been spent getting ready for the holidays. We have been Christmas shopping in full force, and I'm happy to say that we are beginning to see the light at the end of the tunnel. We have also been decorating. We put up our first tree, and have strings of lights everywhere. On the 18th, Tom and I will be going to his company's Christmas party for dinner and dancing. My plans for today include going shopping for our stockings. The holidays are my favorite time of year, and there is something about having Tom around that makes them that much better.

On the wedding front, we have our first cake tasting tomorrow. I am hoping that all goes well because I really like this baker. I was so excited for cake tasting, that I baked some fuzzy navel cupcakes yesterday, and decorated them for the season (yum!).

We are also anxiously awaiting our engagement pictures to be released. The photographer said it should take about a week, and it has been almost two, so they should be ready any day now.

Perhaps the biggest news is the possibility of a ceremony musician. We were discussing ceremony music on a message board that I frequent, and one of the users mentioned that I should really look into hiring a guitarist for our ceremony. I thought that a ceremony musician was out of the budget, but I decided to look anyway just to see what I could find. To my surprise, they are a lot more affordable that I had originally expected. So now I'm in conversations with a classical guitarist about ceremony music. I am beyond excited. If this works out, it might just be my favorite detail of the wedding... well, that and every other detail of our wedding... Anyways, more on this later.

Finally, to end this post on a good note. I drove Tom into work this morning, and we both realized that next year for Christmas, we will be married. It made me feel all warm and fuzzy inside.

Monday, November 29, 2010

DIY Wedding Bubbles, or, Making the Most Out of Dollar Store Finds

Source
I found this picture while randomly surfing the internet one day, and I fell in love. Bubbles during the first dance. How pretty is that? I was trying to find a fun place to add bubbles into our wedding, this is perfect! As an added plus, I asked our reception coordinator if we were permitted to have bubbles during our first dance, and she gave the okay. Yay!

Now the only thing missing is, well, the bubbles. A simple Google search will tell you that a variety of websites exist that sell bubbles, and they also sell them in a variety of shaped bottles and colored bottles. I almost purchased some with purple bottles, but after reading the reviews and discovering that they were in fact hot pink, I opted to decorate my own. That's when I made a discovery, my local dollar store sells wedding bubbles! 9 bottles for a dollar! The only problem, they were a bit on the plain side. Nothing fancy, just a clear bottle with bubble stuff inside. So, I grabbed a couple of supplies, started decorating, and came up with this:

Cute, simple, and straight to the point. First things first, I made the tags on my computer with Open Office, and they are available for download under the "Templates" tab above. I printed mine out on ivory cardstock. The poem is adorable, it reads "To fill the air with a little romance, Please blow these bubbles while we have our first dance."

You will need: 
  • Bubbles
  • Curling Ribbon (also from the Dollar Store)
  • Tags (if you want to use them)
  • Scissors


What you do:

1.     Cut a 12" length of ribbon and snip down the center of each end             about 1/2 an inch. 
 

2.     Thread the tag onto the ribbon.
3.     Wrap the ribbon around the neck of the bottle of bubbles, be                 careful to keep your ribbon below the lid of the bubble bottle.                 Secure with a square knot.
4.     Using the blade of your scissors, curl each length of ribbon. 
5.     Tear each ribbon down the center, using the snips you made in               step 1.

Repeat for each guest. I have 45 of them made right now, I plan to make 150. This is a really easy project, it can just get monotonous so be sure to have a good tv program or something to keep you occupied. 

On a final note, I am storing all of my bubbles in a shoe box. I have a box that contains all of my wedding crafts in one central location, but I keep having this re-occurring thought of one of the bottles of bubble solution leaking and ruining everything else that I have made. As a sort of insurance policy, I figured if a bottle leaks within the shoe box, the mess will at least be contained.

Are you planning to use bubbles at your wedding?

Sunday, November 28, 2010

Candles, The Win-Win Favor Option

Source

The answer to my wedding favor dilemma finally came to me one morning with the help of a DIY message board that I follow. Candles! Plain, simple, frosted glass votive candles. There is a great website, called Candles4Less that sells votive candle holders with candles in a variety of colors in a case of 72 for $35. I am going to order purple ones with ivory candles to decorate the reception, and I am going to order two cases of frosted glass candles to hand out as favors. Along with the candles, each guest will also receive a personalized matchbook. This serves dual purpose, by including a matchbook, guests will be able to enjoy the candles in their hotel rooms if they want, at the same time, for those guests that plan on keeping a candle as a keepsake, it will have some sort of personalization on it. For everyone else, they will have a simple, neutrally colored favor that can easily blend in to any decor. As an added bonus, any candles that are left behind can be used to decorate our home after the wedding. Although, I have already had several members of my wedding party calling dibs on leftover favors. 

Each candle and matchbook will be wrapped in a cellophane baggy with purple curled ribbon. I made custom favor tags through Vistaprint with our monogram and a little message of thanks that will be attached to the ribbons. To make the favor tags, I made a design in OpenOffice Draw. For my design, I used one of the monograms that I made a few months ago. I looked for a little poem to put on the tag as well, but I could not find one that I liked, so I wrote a simple note of thanks instead, with our names. I uploaded my completed design to Vistaprint as business cards, and they should be arriving sometime before Christmas.

I have had this idea for favors for a couple of months now, and I have gotten a lot of positive feedback. In addition to the candle favors, I am also planning to have a candy dish full of purple Hersey kisses on each table to satisfy anyone's sweet tooth. We are also planning to do bathroom baskets and out-of-town bags, but those will be saved for a later post. 

Did you have a plan for leftover favors at your wedding?

Saturday, November 27, 2010

Starting to Think About Favors

My newest project as of late was to determine what sort of favors I wanted to give our guests. Something I did not know prior to planning our wedding day was the level of controversy surrounding the subject of favors. The wedding industry has produced a literal plethora of favor options, simply google the term "wedding favors" and you will receive a nearly endless list of possibilities. For example, it seems that nearly every trinket imaginable can be personalized, such as shot glasses, coasters, and wine stoppers; then there are the cutesy favors with their little poems; and then don't forget the endless array of edible favors, ranging from grandma's cookies to individual packets of tea. There are also the less traditional options of skipping favors all together, or donating money to charity in lieu of favors. There are a variety of arguments for and against charity favors, and it's really not something I want to get into. I also definitely want to give my guests favors, there is just something about a little box with ribbon and a "for you" tag that completes the wedding table setting. Our guests are also travelling a significant distance to join us for our wedding, so I want to do something more than feed them dinner and provide a DJ. I then got to thinking about past weddings that I have been to, and the favors that they used. One friend gave out little trinkets, that I held onto for a little while, before throwing them out because they just collected dust; then another friend handed out personalized CDs of a rather odd mix of music; finally, my cousin, who handed out little scrolls of paper with poems that looked like tampons. Yikes.

My first thought was to hand out edible favors. I was going to make cookies or brownies for each guest to take home. Then the reality of baking 300 or so cookies the week before my wedding kicked in. So I looked into purchasing chocolate lobsters or whoopie pies. The prices for both were prohibitively expensive. I also started looking into the before mentioned pre-made favors. My problem here is that I wanted to hand out a favor that guests would actually want to keep around their homes and use. I nixed the idea of anything personalized, because it increased the cost, and not everyone would want to display something in their homes with our names and date on it. I was looking at cookie cutters and bookmarks in the shape of a starfish, but I was really uneasy about that idea too. What if a large portion of guests opted to leave the favor behind? What would I do with several dozen cookie cutters?

This is definitely something that is going to require more thought and creativity than I had originally planned.

Did you hand out favors at your wedding? How did you decide what to give out?

Thursday, November 25, 2010

Happy Thanksgiving!

Tom and I would like to wish everyone a happy Thanksgiving and a wonderful holiday season. We will be celebrating Thanksgiving with my side of the family this year at my grandmother's house. It will be Tom's first time meeting my extended family.

This post is slightly different than previous posts in that it has very little to do with our upcoming wedding. I am a member of a blogging community, and their featured blogger last week was Eof737 from the blog Mirth and Motivation she wrote a post about "How to Show Gratitude Before Thanksgiving Day" and I really liked the content of it, as a result, I tried my hand at one of her blogging suggestions. Before I get to that, I just want to be honest with everyone and explain that this post was written last Saturday (11/20) and I decided to have it post on Thanksgiving since I figured I would too busy with family to actually log on and post.

Without further ado, 10 things that I am grateful for.

  1. My fiancé Tom. We have been friends for almost 12 years, and he has stood by my side through everything. We have been a couple for almost two years, and I can honestly say they have been the best two years of my life. This is the first time in a long time that I can say that I am looking forward to my future.
  2. My family. I have been around long enough to realize that not everyone has the luxury of a loving family that they want to spend time with. The first time Tom met my mom, step-dad, and sister, he compared us to the Waltons. My extended family is pretty cool too. I am blessed.
  3. My friends. These people are right up there with my family, they are definitely some of the best people around, and I would do anything for them. 
  4. My pets. I just recently redesigned my blog, and added a whole tab about our "kids." We have one dog and two kitties, and they are some of the biggest joy of my life. There is something about the look in their eyes when they look at you, or the softness of a kitty when they jump into bed with you purring, or the excitement of my puppy when we play games; it just warms my heart. 
  5. My health. So many people that I know are affected by cancer and other illness. Our health is something that everyone seems to take for granted until something horrible happens. I am thankful for the health of myself, my family, and my friends.
  6. The love of my parents. If it wasn't for my parents sharing their home with us, I have no idea where we would be right now. There are simply not words to express my gratitude towards them.
  7. The country that I live in. I don't consider myself overly patriotic, and don't even get me started on my political views. Truth be told, there are some truly awful places to live in this world, places with rampent illness, war, and extreme poverty. We are given an education, our homes have power, the water that comes from our pipes is safe to drink, and we can go to the local market to purchase food without fear of serious bodily injury. 
  8. Nature's beauty. Whenever life gets me down, I like to go for a walk. There is something awe inspiring and soothing about the outdoors, whether it be a simply walk through the woods, or the opportunity to stand beside the ocean. I have driven from Maine to Missouri and back again twice, and the thing that stands out the most out of both trips is the landscapes.
  9. Love. The Beatle's said it best, "All you need is love, love, love is all you need."
  10. Laughter. My mantra is if you can't laugh at yourself, what do you truly have? Life is too short to be taken seriously. I am grateful for my ability to smile in the face of adversity, and make the most out of bad situations. Tom has always made it his personal goal to make me laugh when I was upset. Could you imagine how wonderful the world would be if everyone acted this way?
That is my list. What are you thankful for?

Tuesday, November 23, 2010

Dress Shopping- The Bridesmaids

Introducing my sister, Laura. She is my maid of honor, and she happens to be in town from Tampa for Thanksgiving. We took full advantage of her visit, and spent all day Monday doing wedding stuff. Our first stop was at the bridal shop so that she could see me in my dress, and so that we could pick out the bridesmaid's dress. I picked out a couple of dresses when I went shopping with my mom back in August, but I held off on choosing one until my sister would be available to try them on. The first dress she tried on was this pink dress, which matches my dress perfectly. It is also very flattering on her figure. So without further ado, more dress pictures!


This was the second dress she tried on, it did not fit her as well, and it did not have the clean lines that the "pink" dress had.

So we ultimately decided on the pink dress. Here it is hanging next to my dress, the go together really well. Both dresses are A-line cut, with organza over satin. Both dresses also have the split-skirt detail, and the bridesmaids dress has just the right amount of beading to match my dress.

Source
The actual dresses will be made in "thistle" which is almost an identical match to Alfred Angelo's Victorian lilac. This is a better idea of what the actual dresses will look like. 

Monday, November 22, 2010

Dress Shopping- My Dress

Just like so many brides before me, I started looking at pictures of wedding dresses online shortly after Tom proposed. After a bit of searching, I discovered Alfred Angelo and I knew that I wanted to be an Alfred Angelo bride. In August, I called around to the local bridal shops to find one that carried Alfred Angelo dresses. I found this little shop in my home town, and booked an appointment with my mom. My original thoughts were that I wanted a simple, white dress, with a splash of color and a halter top. I didn't want something that was overly ornate, and I did not want lace. When we got to the store, the attendant insisted on having me try on several different styles of dresses just so that I could see how they looked on me. I went on to try on several dresses. The second dress stood out to me. It's ivory, strapless, satin with a layer of organza, with pearls and rhinestones. I thought it was ugly on the hanger, and I almost did not try it on. Then I did, and I was in love. But first, let's see some runners up.


This was the first dress I tried on, I loved the split skirt, but the beading was a bit much, and the dress did not have the splash of color I was looking for.

This is actually the dress I fell in love with online. But once I put it one, I discovered that white does not work with my skin tone, and I hated the dress. 

This is a another style of dress. It gave me an amazing figure, but (as you can see from my face) it just wasn't me.

Then I tried on a halter top dress. I liked this dress, I would even be willing to say it is my second choice. By this point in time, every dress was being compared to the second dress. Finally, the attendant asked if I wanted to put the second dress back on. I immediately obliged.

 
So, on it went. I'm in love. The dress is so elegant and flowy. They pinned a Victorian lilac sash over the champagne sash so that I could see how my dress would look. I got all the more excited. We also played with headpieces. This was before I opted against a tiara. 

Source
My mother was not able to get a full length picture of the dress. So here it is, Alfred Angelo style 2086 in ivory with Victorian lilac trim. 

And my favorite part, all the little details. The embroidery is a silver metallic, and the rhinestone and pearls add just the right amount of sparkle. It has a chapel length train that I will have bustled for the reception.

Sunday, November 21, 2010

DIY Paper Flowers

Tom and I had our engagement pictures taken this afternoon at Portland Headlight. The weather was a bit chilly, but that just meant I had an excuse to snuggle up close to him. It was perfectly clear, and the sky was a nice shade of blue. I love our photographer, he was very professional, but we also seemed to "click" really well. The photographer said that he will post our pictures online in about a week, I can't wait to see how they turned out.

In other news, I have noticed on many of the wedding message boards that brides are opting to make their own flowers instead of having real ones. Some of the alternatives to real flowers are really cute, for example, I have seen brooch bouquets, butterfly bouquets, and bouquets made of fabric flowers. As far as our wedding goes, we are having the real thing. I love roses, Rose is my middle name, and I want to be carrying real roses when I walk down the aisle. On the flip side, I am a crafty person, and I wanted to try my hand at making "flowers."

In my internet surfing one night I came across The Scrap Shoppe and directions to make "ceramic" paper roses I followed the directions exactly, and created a bunch of lavender roses, just like the ones that will be in my bouquet. Then I got creative, and decided to make some leaves to go along with the roses. To make the leaves, I prepared the cardstock the exact same way as described in the directions above, and then I simply cut out leaf shapes once the cardstock was dry. To add more dimension, I folded each leaf in half and creased down the middle.

For the three-rose piece, I cut a strip of left over lavender cardstock and simply attached the roses and leaves with hot glue.

I think I am going to attach pin backs to the back of my roses so they can be worn as corsages at the rehearsal dinner. Right now my plan is that I will wear the three-rose corsage and my mother will wear the single rose. This project is simple enough that I am considering making some more corsages for my bridesmaids, but we will have to see where that goes.  The roses are absolutely gorgeous in person, they mimic the look of porcelain roses.

Did you use handmade flowers in your wedding?

Saturday, November 20, 2010

What to Wear?

As I mentioned in the previous post, our engagement pictures are scheduled to be taken tomorrow. Now for the real challenge: figuring out what I'm going to wear! Tom is a manly man, and the majority of his wardrobe consists of jeans and t-shirts. I have nothing against dressing for comfort, but I don't quite think it is appropriate for a photo session, especially with the predicted 30 degree temperatures and possible snow showers, and did I mention we were having our pictures taken on the ocean? Engagement pictures are supposed to be on the casual side, it's more of an opportunity to meet with the photographer than anything else, so I am cool with both of us wearing blue jeans. I'm going to wear my black loafers, and he will wear his black boots, I'm not sure if the photographer will take pictures of our shoes, but at least we'll coordinate if he does. As far as shirts go... Tom owns one long sleeve shirt that would look appropriate to wear with jeans. It is the same shirt that he wore for our first engagement session that my mom shot. I love the shirt, I picked it out, and I must say, I have good taste. Now what should I wear? A black top? A coordinating (but not matching) purple sweater? A different top completely? Decisions! I need to find my winter jacket too...

Friday, November 19, 2010

Pro Engagement Pictures are Booked!

So, I finally tracked down the photographer. Or, more appropriately, I found a different photographer. I loved the first photographer's pictures, but I could have cared less for his complete inability to return my phone calls or e-mails. My original intention was to have our engagement pictures taken in mid-October, when fall foliage would have been at it's peak. I guess that was not meant to happen. By the time November rolled around, I finally talked to the manager of the company and expressed my dissatisfaction. My concern was that if I was having such a hard time tracking this photographer down for an engagement session, would he be reliable enough to show up at the wedding? The manager allowed me to change photographers. So, back to the drawing board. I looked at a variety of portfolios and ultimately decided on this one. I have to say, I'm already impressed.

The manager of the photography company forwarded my information to the photographer, and less than a week later I received and e-mail and a phone call to schedule our engagement pictures. The photographer asked that I provide three dates that we would be available, and then worked with our schedule to fit in a session. I am happy to say that our engagement session is scheduled for this Sunday at Portland Headlight. The location is gorgeous, I only wish that the weather would cooperate. Right now, the temperature is expected to be in the 30's, and the wind off of the ocean is not going to help anything. Now to figure out what we are going to wear...

Did you experience any difficulties with any of your vendors? How did you resolve the situation?

Monday, November 15, 2010

DIY Pearl Embellished Bobby Pins or Starting to Think About my Hair

I have long hair. I always have, and I probably always will. It currently goes about halfway down my back, and I have no intention of cutting it, with the exception of an inch or two, before the wedding. The whole point of having long hair is that it is fun to play with. I love doing stuff with my hair, like putting it up in a pony tail, or wearing a fancy barrette or headband. I guess it only makes sense that I am putting so much thought into how I want to wear my hair for the wedding. I mean, for a hair stylist, it is literally a blank canvas. It's long and straight, no prep work needed.

Source
I knew from the beginning that I want my hair to be in a complete up-do for the wedding. My hair is baby fine, and unless I brush it every couple of hours, it goes stringy really quickly. My hair also likes being straight, and refuses to hold a curl for any amount of time. I used to dream of someday having ringlets, I have learned to accept that will not happen in this lifetime. So, an up-do it is. I started looking at the plethora of pictures of bridal up-dos online, and I fell in love with the look pictured at the right. Look at all the loops! Now, imagine my cathedral length veil pinned underneath (and easily removable for the reception!). The next step was finding a headpiece to compliment everything. I originally was thinking tiara, I mean, come on, when else does a grown woman get to wear a tiara? A couple of problems came up with that. Firstly, Tom told me straight out that he doesn't care for them. Okay, I need to impress my groom. Then the next issue, the dress I picked out (more on this later) has some really ornate beading on the top of it, and a tiara would likely pull the eye away from that. Also, my hair is so thin, that I would not be able to pull off a tiara with any sort of height to it. Then I started looking for combs, but that went nowhere. Everything I liked was over $100 (for something I would wear 1 day?!?) and everything I could realistically afford looked too much like a mini-tiara. So, then I started looking at Etsy. I love Etsy, it's an like Ebay, but for handmade stuff. I like to look at other people's ideas to get inspiration for my own crafts. I found a listing for pearl embellished bobby pins, and they were really pretty. The listing only had one pearl per pin, but it was enough to inspire me, and my pearl embellished bobby pins were born!

What you will need for each bobby pin:

  • 25 gage wire
  • bobby pin
  • three pearls
  • needle nosed pliers

What you do:
  1. String your first pearl on the wire and bring it to the center. 
  2. Fold the wire down on either side of the pearl, then using your pliers, pinch the two wires together. 
  3. Holding both wires firmly with the pliers, use your other hand to twist the pearl around several times. 
  4. Repeat steps 2-4 on either side of the center pearl with your two additional pearls. Be sure to keep a firm grasp on the wire while twisting your pearls.
  5. Once all three pearls are wired in, bring both wires down so that they lined up with the center pearl.
  6. Grasp the wires with the pliers 1/8 of an inch below the pearls, with your other hand, hold all three pearls together and twist. This should twist the wire directly below the pearls. 
  7. Now it is time to attach the pearls to the bobby pin. Using your pliers, wrap each wire around the top of the bobby pin. Be careful to pull the wires tight so that the pearls are firmly attached to the top. I wrapped each wire around two-to-three times.
  8. Cut the wire, and use the pliers to pinch the cut end tightly up against the bobby pin. 
  9. I found if the pearls are a bit wiggly on the top of the bobby pin, I could just twist them a couple times to tighten everything up. 

I've made ten bobby pins, which should be enough. I don't want to have the pearls look crowded. I played around with the bobby pins in my hair on Saturday, I had my hair in a bun with the bobby pins securing it in place and my veil underneath. Everyone (including Tom) approved. I also like just holding them in a group. The wire looks so intricate, and the whole look is just pretty.